The task is the unit you work in. Understanding the model takes about two minutes, and it’s the thing everything else in Termic builds on.
The model
Three nouns, nested:
- Project: a pointer to a git repository, plus its scripts, preview URL, sandbox defaults and default agent. A project can actually contain more than one repo, but the common case is one.
- Task: one stream of work against a project. Most tasks are a git worktree: a separate checkout on disk, on its own branch. Some are main checkout tasks that share your live checkout.
- Tab: what’s running inside a task: an agent CLI, a plain shell, an editor, or a diff view. A task can have several.
So: a project has many tasks, and a task has many tabs.
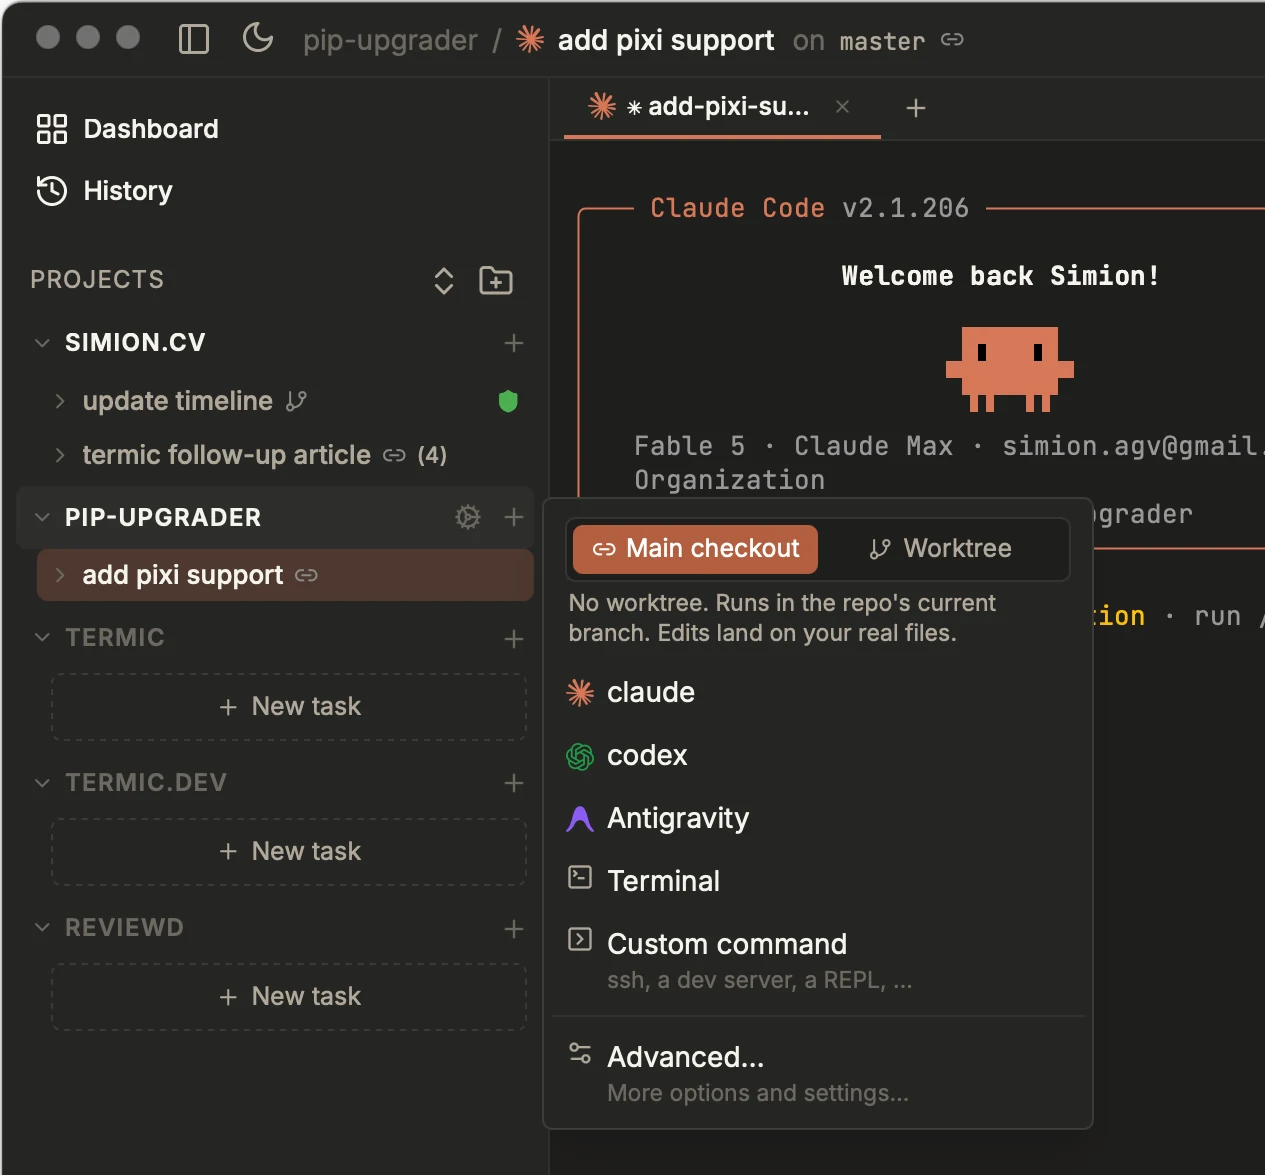
Starting a task: Worktree for isolated, parallel work, or Main checkout to attach an agent to your live checkout. Pick the agent right from the menu.
The New Task dialog has a worktree vs main checkout toggle, so you can launch an agent in an isolated worktree (the default) or directly in the main checkout with no git worktree created. The dialog remembers your last choice: the task type (worktree or main checkout) and the sandbox mode you picked last time carry over, so you don’t re-pick them every time.
Cmd+N opens a quick project picker that fuzzy-searches any project and starts a new task, without scrolling the sidebar to find the project first.
Worktree tasks
When you create a Worktree, Termic runs git worktree add to create a fresh checkout under ~/termic/tasks/<project>/<name>/, on a new branch cut from your project’s base branch. (The directory root is configurable in settings.) This is real git plumbing, not a copy: the worktree shares the project’s object database but has its own working tree, index and HEAD.
Why this matters in practice:
- Isolation. An agent can rewrite files, run a build, install dependencies, and break things without touching your main checkout or any other task.
- Parallelism. Several worktrees means several agents working on several branches at the same time. See Parallel agents.
- Clean teardown. Archiving a worktree task removes the on-disk checkout and stops anything it was running. Nothing lingers.
A couple of details worth knowing:
- Termic creates the branch in two steps (
git branch --no-trackthengit worktree add) so that deleting a task’s branch later doesn’t prompt you about dropping the upstream ref it was branched from. - git-crypt repositories work in worktrees: Termic symlinks the key directory into the per-worktree git dir and resets so the smudge filter can decrypt.
- Agent sessions auto-resume. Each worktree has its own directory, so the CLI’s directory-based
--resume/resume --lastreconnects you to the same session after a sleep or relaunch.
Duplicate a worktree
From a task’s menu, Duplicate worktree seeds the new-task dialog with the source task’s current branch tip as its base. This is how you fork a parallel attempt: let an agent get halfway, duplicate, and try a different approach from the same starting point in a second task.
Main checkout tasks
Not every change is worth a branch. Main checkout attaches an agent directly to your project’s live checkout, with no worktree at all. Use it for a one-off question, a README edit, a quick dependency bump, the kind of thing where spinning up an isolated branch is more ceremony than the task deserves.
Main checkout tasks behave a little differently, by necessity:
- They point at your real working directory, so changes are immediately in your checkout. There’s no “send to main” step because you’re already there.
- Archiving doesn’t delete anything. It just closes the task; your repo is left exactly as it is.
- You can create several main checkout tasks per project. Because they all share one directory, Termic mints a session UUID for each on first spawn and resumes that on every later spawn, so they don’t accidentally pull in a
claudesession you ran outside Termic. The sidebar prompts for a name (defaulting toclaude-1,gemini-1, and so on).
This is one of the clearest differences from Conductor, which only ever gives you a worktree per task.
Which one should I use?
A simple rule:
- Parallel work, risky changes, anything you’ll want to test on its own port → new worktree.
- A quick edit, a question, a small fix on the branch you’re already on → main checkout.
You don’t need parallel work to get value here. Even a single main checkout task gives you tabbed agents, the editor and diff view, the run panel, and one-click session resume, a better day-to-day shell for the CLI you’re already running.
Per-task sandbox and YOLO
Two safety settings are pinned to the task, not the app:
- The sandbox mode (Off, Monitoring, or Enforcing) is chosen when you create the task, inheriting the project’s default, and editable later.
- YOLO (skipping per-action permission prompts) is set per task from its sidebar menu, when the task isn’t already enforced. An Enforcing sandbox turns it on automatically, since the cage is the real boundary. There is no global YOLO switch.
The sidebar flags a task running YOLO without an Enforcing sandbox with a red badge, so a dangerous combination is never invisible.
Idle and archived
Tasks you aren’t actively using show a moon icon in the sidebar when their agent goes quiet. Archiving (and deleting) runs on a background thread, so removing a task with a 50,000-file node_modules doesn’t freeze the UI.
Right-click a task in the sidebar to open its actions menu (the same one you reach from its row), where you’ll find Duplicate worktree, YOLO, the sandbox mode, and archiving.
Related
- Multi-repo tasks: more than one repo under a task.
- Parallel agents: running many at once.
- Spotlight: run your whole stack from the main checkout against one task.