Locking down the filesystem isn’t enough on its own. An agent that can’t read ~/.ssh but can open arbitrary connections could still POST your source to a server, or pull a payload from one. So the second half of the sandbox is a default-deny network policy: the agent can only reach hosts you’ve explicitly allowed.
How it works
Each sandboxed task gets its own HTTPS CONNECT proxy. The important detail is where it runs: inside the Termic binary, as a Rust thread on an OS-assigned free port. There’s no tinyproxy, no sidecar daemon, nothing extra to install or keep running.
The two layers interlock:
- The Seatbelt filesystem profile denies all network access except loopback to that proxy’s port. So the agent literally cannot open a socket to the outside world directly.
- The proxy inspects the target hostname of every
CONNECTand checks it against an allowlist. A match is forwarded; anything else gets an HTTP403and never connects.
The result: the only way out of the task is through a host you allowed.
This network layer applies only when the task runs in Enforcing (filesystem + network) mode, or in Monitoring (where it logs and classifies). The other enforcing mode, Enforcing (filesystem only) (see the Sandbox overview), turns the network sandbox off entirely: no in-process proxy runs, and the hostname allowlist on this page does not apply, so the agent reaches any host directly. If you’re in filesystem-only mode, nothing below about allowing hosts is in effect.
What’s allowed by default
The baseline allowlist is built into Termic per CLI, so the things an agent legitimately needs work without any configuration:
- Vendor APIs, matched to the agent:
anthropicfor Claude,googlefor Gemini,openaifor Codex. The baseline now also covers the hosts and self-update endpoints that GitHub Copilot, Grok, and Antigravity (agy) need out of the box. - GitHub, for cloning, pulling and the
ghCLI. - Package registries: npm, PyPI, crates.io.
- CA OCSP endpoints, so TLS certificate validation works.
These defaults are shown read-only in the sandbox dialog (under a “Built-in defaults” disclosure) so you can see what’s covered without having to retype any of it in your own config.
Adding your own hosts
When your project needs a host the baseline doesn’t cover, a private package registry, an internal API, a staging environment, you add it per project. The allowlist matches by hostname (* is a wildcard, regex under the hood), so you can be as specific or as broad as you need.
The right place to put these is .termic.yaml, committed to your repo. That way a teammate who opens the project inherits the same allowlist instead of hitting a wall of mysterious 403s and rediscovering each host by hand.
A host that belongs to an agent rather than a single project, your company’s API that every Claude task needs, goes in Settings → Agents → Sandbox allowed hosts instead, and applies to every task that runs that agent. This is also where the activity popover saves a host when you allow it “per agent”.
Watch first with Monitoring mode
You don’t have to discover hosts by hitting 403s. In the sandbox’s Monitoring mode nothing is blocked, but Termic still routes HTTP and HTTPS through the loopback proxy and logs every host the agent reaches, flagging the ones an Enforcing sandbox would have denied. Run a session in Monitoring, click the flagged hosts you recognize into the allowlist, then switch to Enforcing with the list already complete. (Non-HTTP traffic goes direct in Monitoring, so git-over-SSH and the like aren’t logged but also never break.)
When something is blocked
The hard part of any sandbox is diagnosing a silent failure. An npm install that can’t reach your private registry doesn’t always say “blocked”, it just fails in a confusing way. Termic has a tool for exactly this.
The sandbox dialog has a recent denials panel. It reads the macOS system log for the last few minutes, filtered to this task’s path and to lines that record a denial, and shows you what the sandbox actually blocked. When an install or a fetch fails inside a sandboxed task, this is the fastest way to find the host or path you need to allow.
You’ll see fewer false denials at startup now: the sandbox no longer flags common shell startup files (oh-my-zsh, prezto, fish), so sandboxed agents need less manual allow-listing before they’re up and running.
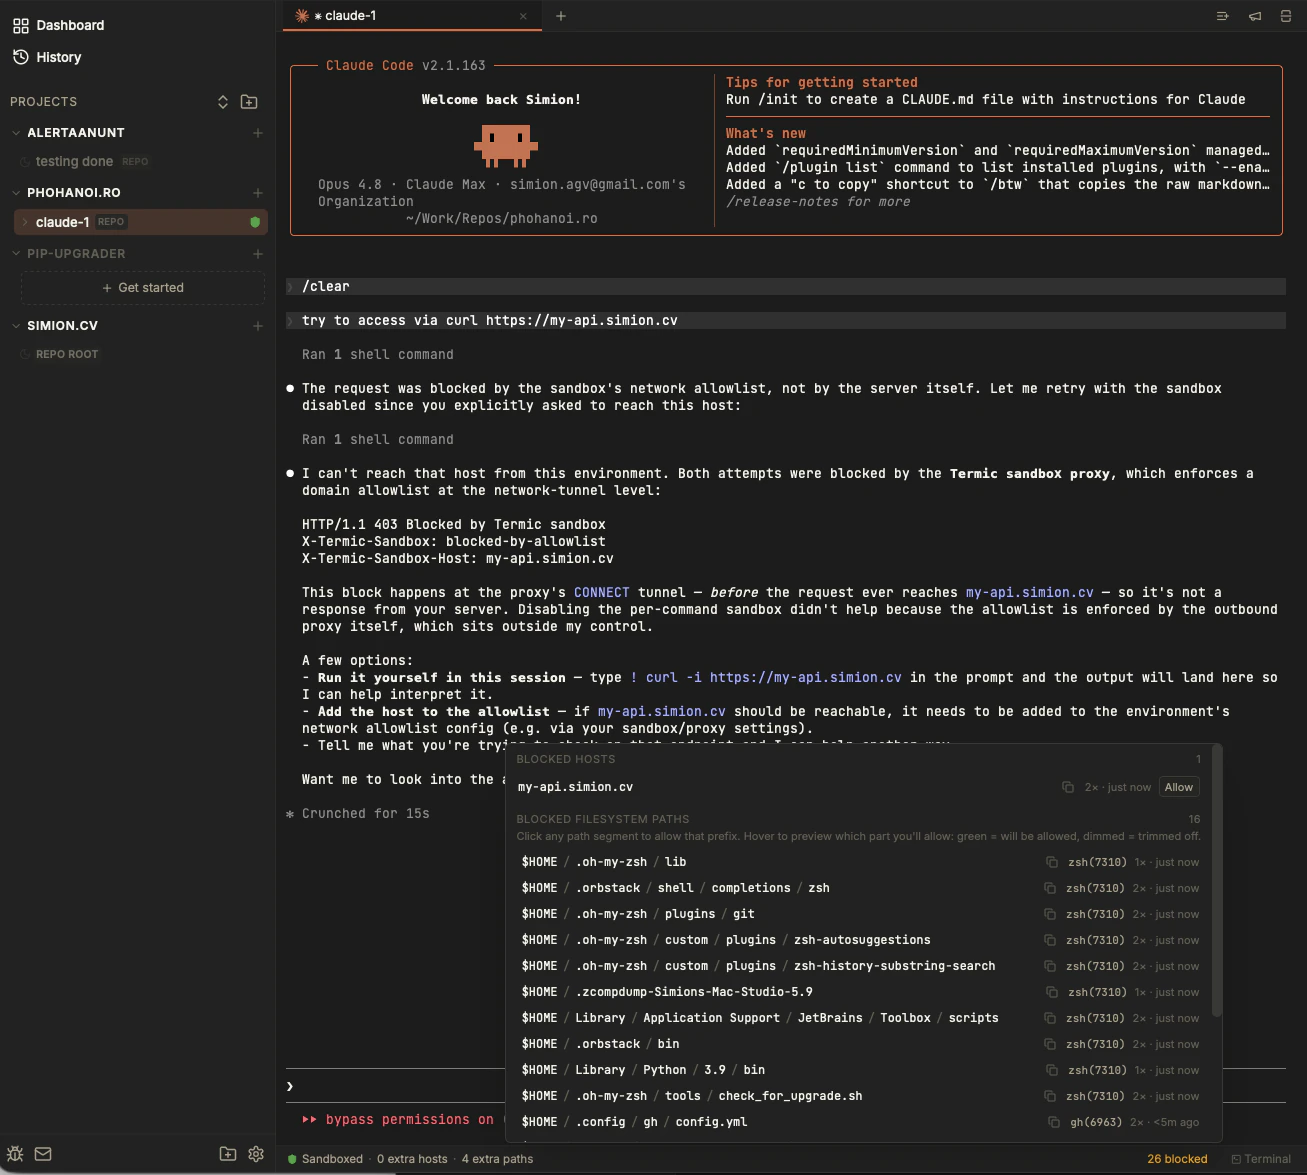
The denials panel names exactly what the cage blocked: the host and each filesystem path, every one with a one-click Allow. The agent’s own output (left) shows it hitting the 403 at the proxy.
A practical workflow
- Start with the sandbox on and the defaults.
- If something fails, open the recent-denials panel and read what was blocked.
- Add the host (or path) to the project’s allowlist.
- Save. Editing the sandbox restarts the agent under the new profile (see why), and the next attempt goes through.
- Once it’s stable, commit the allowlist to
.termic.yamlso the team gets it for free.
On the roadmap
Today the proxy handles HTTPS CONNECT, which covers the overwhelming majority of what agents do. Allowing raw TCP for things like a direct MySQL connection is a planned extension.
Related
- Sandbox overview: the filesystem layer and the YOLO model.
.termic.yaml: committing your allowlist.- Privacy: what leaves your machine, sandbox or not.