This is the fastest path from a fresh install to an agent writing code in your repo. It assumes you’ve already installed Termic and have at least one of claude, codex or grok available on your PATH.
1. The welcome screen
On first launch, Termic scans your PATH for known agent CLIs. Installed ones show up green, missing ones gray. You don’t need all of them; one is enough to start. If you have none, Termic falls back to a plain shell, and you can register any agent later.
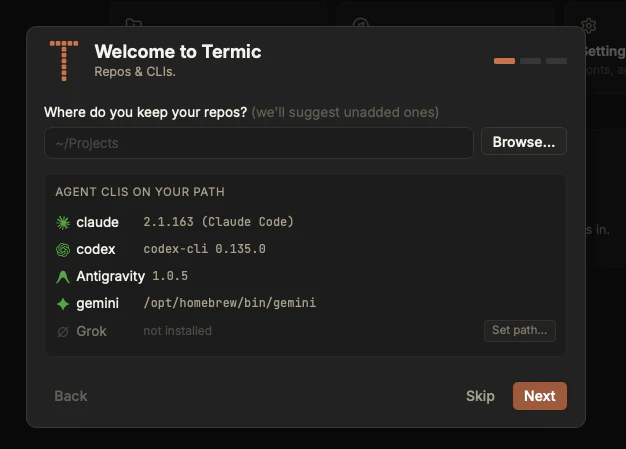
The welcome screen finds your agent CLIs automatically: detected ones (with versions) in green, missing ones like Grok in gray with a Set path option.
2. Add a project
A project is a pointer to a git repository plus its scripts and settings. Add one by picking a local folder that’s already a git repo. That’s all a project needs to exist; scripts, a preview URL and sandbox defaults are optional and can be filled in later from Repository settings.
3. Open a task
This is the decision that defines the Termic workflow. Each project row offers two ways to start an agent:
- Worktree. Creates a separate copy of the repo on disk, on a fresh branch off your default. This is the isolated, parallel-friendly mode: run a dev server on its own port, let the agent churn, archive it when the work merges. See Tasks & worktrees.
- Main checkout. Attaches the agent directly to your actual checkout, no worktree. Best for a quick question, a README tweak, or anything not worth a branch.
Pick the agent you want from the same menu (claude, codex, grok, or whatever you’ve registered). Termic spawns the real CLI in a terminal tab and, for a worktree, runs your setup script first if you have one.
4. Talk to the agent
The tab is a real terminal running the real CLI. Type your prompt and work exactly as you would in iTerm, because it is the same binary. A few things Termic adds around it:
- A blue dot appears on the tab when the agent finishes a turn and you’re looking elsewhere, so you don’t have to babysit it. See Work-done & notifications.
⌘Popens a fuzzy file finder;⇧⌘Fsearches across the repo.⌘Topens another tab (another agent, or a plain shell) in the same task.
5. Run and preview
The panel at the bottom of a task has Setup, Run and Open. Run streams your dev server’s output live; Open expands your project’s preview URL template (with the task’s port substituted) and opens it in your browser. Configure these once per project and every task inherits them. See Scripts: setup & run.
6. Review the diff
When the agent’s done, open the diff view to see exactly what changed against HEAD, side-by-side or unified, with syntax highlighting. If you like what you see in a worktree, Send to main lands the diff in your main checkout. See Editor & diff viewer.
You can also have a second agent review the first one’s work: fire the built-in Review prompt from the prompt library at a fresh agent and it gets the branch’s diff.
7. Finish up
When the work is merged or abandoned, archive the task. For a worktree, that tears down the on-disk copy and stops any running dev server. For a main checkout task, archiving just closes it; your checkout is left untouched.
Where to go next
- Tasks & worktrees: the core model in depth.
- Parallel agents: running several at once, the whole point.
- Sandbox overview: let an agent run unattended without it reaching your secrets.
- Migrating from Conductor: if you’re coming from there.